概要
Windows(10)とLinux(Ubuntu16.04)を相互にリモートデスクトップ接続(RDP接続)できるように設定できたので整理しました。
UbuntuからWindows
「rdesktop」というツールを使うと簡単にできます。
インストール方法
aptコマンドで一発です。
sudo apt install rdesktop
使い方
コマンド上でrdesktop+IP+オプションを指定します。
#IPを指定
rdesktop 192.168.xxx.xxx
フルスクリーン表示
フルスクリーン表示したいときは-fを指定。なお、フルスクリーン表示から戻りたいときは、「ctrl+alt+Enter」で戻れます。
rdesktop 192.168.xxx.xxx -f
クリップボードを使う
クリップボードを有効にしたいときは -r clipboard:PRIMARYCLIPBOARDを指定。
rdesktop 192.168.xxx.xxx -r clipboard:PRIMARYCLIPBOARD
音楽を流す
クライアントの音源を使ってリモート先の音楽を流したいときには -r sound:localを指定。
rdesktop 192.168.xxx.xxx -r sound:local
その他オプション
その他すべてのコマンドは下記参照。
Usage: rdesktop [options] server[:port]
   -u: user name
   -d: domain
   -s: shell / seamless application to start remotly
   -c: working directory
   -p: password (- to prompt)
   -n: client hostname
   -k: keyboard layout on server (en-us, de, sv, etc.)
   -g: desktop geometry (WxH)
   -i: enables smartcard authentication, password is used as pin
   -f: full-screen mode
   -b: force bitmap updates
   -L: local codepage
   -A: path to SeamlessRDP shell, this enables SeamlessRDP mode
   -B: use BackingStore of X-server (if available)
   -e: disable encryption (French TS)
   -E: disable encryption from client to server
   -m: do not send motion events
   -C: use private colour map
   -D: hide window manager decorations
   -K: keep window manager key bindings
   -S: caption button size (single application mode)
   -T: window title
   -t: disable use of remote ctrl
   -N: enable numlock syncronization
   -X: embed into another window with a given id.
   -a: connection colour depth
   -z: enable rdp compression
   -x: RDP5 experience (m[odem 28.8], b[roadband], l[an] or hex nr.)
   -P: use persistent bitmap caching
   -r: enable specified device redirection (this flag can be repeated)
         '-r comport:COM1=/dev/ttyS0': enable serial redirection of /dev/ttyS0 to COM1
             or      COM1=/dev/ttyS0,COM2=/dev/ttyS1
         '-r disk:floppy=/mnt/floppy': enable redirection of /mnt/floppy to 'floppy' share
             or   'floppy=/mnt/floppy,cdrom=/mnt/cdrom'
         '-r clientname=<client name>': Set the client name displayed
             for redirected disks
         '-r lptport:LPT1=/dev/lp0': enable parallel redirection of /dev/lp0 to LPT1
             or      LPT1=/dev/lp0,LPT2=/dev/lp1
         '-r printer:mydeskjet': enable printer redirection
             or      mydeskjet="HP LaserJet IIIP" to enter server driver as well
         '-r sound:[local[:driver[:device]]|off|remote]': enable sound redirection
                     remote would leave sound on server
                     available drivers for 'local':
                     alsa:      ALSA output driver, default device: default
         '-r clipboard:[off|PRIMARYCLIPBOARD|CLIPBOARD]': enable clipboard
                      redirection.
                      'PRIMARYCLIPBOARD' looks at both PRIMARY and CLIPBOARD
                      when sending data to server.
                      'CLIPBOARD' looks at only CLIPBOARD.
         '-r scard[:"Scard Name"="Alias Name[;Vendor Name]"[,...]]
          example: -r scard:"eToken PRO 00 00"="AKS ifdh 0"
                   "eToken PRO 00 00" -> Device in Linux/Unix enviroment
                   "AKS ifdh 0"       -> Device shown in Windows enviroment
          example: -r scard:"eToken PRO 00 00"="AKS ifdh 0;AKS"
                   "eToken PRO 00 00" -> Device in Linux/Unix enviroment
                   "AKS ifdh 0"       -> Device shown in Windows enviroment
                   "AKS"              -> Device vendor name
   -0: attach to console
   -4: use RDP version 4
   -5: use RDP version 5 (default)
   -o: name=value: Adds an additional option to rdesktop.
           sc-csp-name        Specifies the Crypto Service Provider name which
                              is used to authenticate the user by smartcard
           sc-container-name  Specifies the container name, this is usally the username
           sc-reader-name     Smartcard reader name to use
           sc-card-name       Specifies the card name of the smartcard to use
WindowsからUbuntu
いくつか方法があるかと思いますが、一番簡単にできたVino+XRDPを紹介します。VinoがVNCのサーバーで、XRDPがリモートデスクトップのサーバです。
インストール方法
VinoもXRDPもひと手間必要です。以下説明していきます。
Vinoのインストールと設定
Vinoは元々Ubuntuであればインストールされていると思いますが、設定を変えないとそのままでは使えません。まず、デスクトップ画面左上にある「Search your computer」を開き、「vino」と入力、表示された「Desktop Sharing」を開きます(表記は英語のもの)。
次に以下のサイト様等を参考に、vinoの設定をします。
http://takaq1.plala.jp/contents/bean/vino/index.html
閉じるボタンを押すと、自動的にVinoはアクティブになり、5900ポートでLISTENします。ただし、一般的でない認証があるようで、Windowsからリモート接続するためには解除が必要です。
方法としては、コマンドで以下を打つか、以下サイト様を参考にdconf-editorでrequire-encryptionをfalseに変更します。
gsettings set org.gnome.Vino require-encryption false
http://takaq1.plala.jp/contents/bean/dconf-editor/index.html
これでvinoの設定は完了です。
XRDPのインストールと設定
XRDPはaptコマンドでインストールできます。
sudo apt install XRDP
次に設定を変更します。nanoエディタ等でxrdp.iniファイルを編集します。
sudo nano /etc/xrdp/xrdp.ini
[xrdp1]の設定のportについて、-1(自動)から5900(Vino)に編集しましょう。
[xrdp1]
name=sesman-Xvnc
lib=libvnc.so
username=ask
password=ask
ip=127.0.0.1
port=5900
最後にxrdpを再起動すれば準備完了です。
sudo service xrdp restart
使い方
リモートデスクトップ接続を開き、いつものようにIPアドレスを設定し接続します。VNCなので、カラーは15bit等、少なめにしておいたほうがいいと思います。
すると以下のような画面が開きますので、ユーザ名とパスワードを入力して接続しましょう。
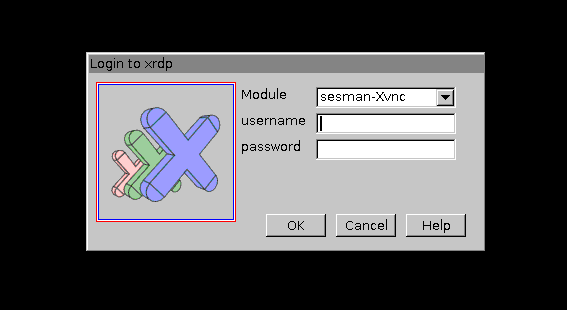
WindowsからUbuntuにリモートデスクトップ接続できました。
まとめ
Windows(10)とLinux(Ubuntu16.04)を相互にリモートデスクトップ接続(RDP接続)する方法について紹介しました。とりあえず動きましたが、WindowsからLinuxはVinoを使っているためかなり描画が遅く感じます。時間を見つけて別の方法にトライしたいです。